Showing posts with label paperchase. Show all posts

Sunday, 30 March 2014

My Week #12, a note about #13 and an apology

Greetings humans! 

Week #12 was rather run-of-the mill, busy but absolutely fine...


...or so I thought. I had open days on Monday and Tuesday, and from then onwards, without wishing to say too much, I descended into a Total Mess (hence no photo). I realised that this had been building up for a couple of weeks, and I'm hoping I'll feel a bit better soon. An apology is due, because my attempts to post have been absolutely atrocious recently. I have a few posts lined up though, so hopefully everything should improve.

I hope you had a better fortnight than me(!)

Sunday, 16 March 2014

My Week #11

Greetings humans!

This week has been so busy. I had my half-an-hour-long EPQ presentation on Monday, tonnes of revision to do, and my theory test yesterday (I passed!). I then was let loose in Paperchase, which as we all know can only go extremely well. One of the best parts of my week was definitely going to see The Bible: the complete word of God (abridged) on Wednesday - thoroughly enjoyable!


Apologies for the poor photo quality, I've not the slightest idea as to what's going on with it.

I hope you had a good week!

Tuesday, 11 March 2014

Setting Up a Ring-Bound Planner

Greetings humans!

Today I thought I'd share with you a few tips as to how to set up a ring-bound organiser. I don't really remember when I did this, since I've had a ring bound organiser of some kind for over ten years now and I've only recently discovered the online planning community. Anyway...

Lists!
I'd really recommend listing what you need in a planner before doing anything else. Diary? Diaries? Lots of notes pages or to-do lists? Thinking about what you need is especially important with a ring-bound planner since you want to fit as much useful stuff in there as you can without making it bulky with all the things you don't really need or use. 


The Diary
Definitely give this special consideration. How will you use the diary? Just for appointments or for your to-do lists or as a journal as well? I use four diaries: Month on Two Pages, Week on One Page, Week on Two Pages and a Day per Page. It may seem like overkill, but it all works for me. 

The Pen
This may seem like a little detail, but honestly, the right pen can be make or break for a planner. I prefer Muji 0.5mm gel pens (both normal and erasable), but it's up to you. I use erasable pens for plans so if they change then I can just rub the entry out. 


Accessories
Welcome to the internet, where everyone else has all the pretty stickers which you think would look SO GREAT in your planner. And they probably would. But the thing is, do they work for you? I'm thankfully emerging from the "I Need Everything" phase now, but similarly to diary inserts, think about what's actually useful. I've used a WO2P insert for what seems like forever for my day-to-day planning, just because firstly my family, and then the internet, was full of people using that system. But now I'm using a Day per Page and that's working out for the best. Similarly, massive(ly cute) post-it notes and other such frivolities began to hinder, not help, my planning. Here are some of the products that I use now, and enjoy using:


So, there are a few tips as to how to set up a ring-bound planner. Has anyone else got any more tips? Please post in the comments!


Sunday, 9 March 2014

My Week #10

Greetings humans!

Another week, another post. I'm determined to schedule some more posts this weekend and get my blogging mojo back! I thought I'd take advantage of that strange ball of fire in the sky and photograph my planner outside, since I haven't been outside the house since Friday afternoon. 

I hope you had a good week!

Sunday, 23 February 2014

My Week #8

Greetings humans!

So, this week was half term, and therefore a free week with which I could do ALL THE REVISION! Right? Well, sort of. In the midst of all the revision I've done, I've forgotten about the Actual Homework that I was set at the end of last term. Today involves a tonne of manic essay-writing and coursework-editing, since I am clearly very...organised...*crawls into hole*


Sunday, 15 December 2013

Blog Post Planning


Greetings humans!

Today'll bring with it a quick post regarding how I plan my blog posts with my A5 Paperchase Organiser. If you've been reading my blog since it began, you'll be aware that the frequency with which I post is unreliable to say the least. As a consequence, I have created these inserts to help me plan when I'm going to post (the aim is twice a week), and especially with 2014 coming up and my plan to join in with the lovely Angela-from-paperlovestory.com's "My Week", I know I need to be as organised as ever. 

There are two of these to an A4 page, so when scaled down to A5 and printed double sided, I can get eight of these on one sheet of A4 paper.
The page is fairly self-explanatory. Blog post planning has its own sub-section in the Planner tab of my A5, and I also use Paperchase's monthly pages (well, for 2014 anyway) to schedule my posts, since this is an easy and visual way to make sure I'm staying on track.

(Apologies for the shoddy editing - the natural light is poor at the moment and I'm trying desperately to cover that up)
So, that's how I'm organising my blog posts now. Hopefully they'll be a bit more regular...(she says, posting on a Sunday when she meant to post on a Saturday)

Saturday, 7 December 2013

Double trouble!

Greetings humans!

Today I want to share a little set-up change with you. There's a bigger one coming in the new year, but for now...


I'm using a satellite and home binder. My A5 from Paperchase wasn't getting much love, and my productivity levels were slipping as it is, so I thought I'd use it for things I need to get done at home. This is something I've found difficult recently, since I stay at school to do homework so I'm not used to working at home so much. I've been using this setup for a week and it's actually going quite well - they're not 100% synced, but I've got a lot more done, and that can't be a bad thing! Another positive with this set-up is that I've managed to clear out my Personal, meaning that it's not as heavy or difficult to close. Result! Now I keep my blog planning, wish lists and other information in my A5, which also has the advantage of nobody secretly snooping at it whilst I'm at school (yes, yes, it still happens).

As I mentioned, I've done some blog post planning. But more on that later!


Friday, 1 November 2013

UCAS (in my Filofax)

Greetings humans!

Sorry for not posting in a while; I've been swamped with work and have been putting the final touches to my UCAS application. Today I want to share with you how I've organised the latter.


It's got its own little sub-section, which I've tabbed with a Martha Stewart x Avery tab and a cute owl sticker from Paperchase. On the front page I just placed some washi tape and wrote over it with permanent marker.


When it's opened up, the first page is a (very messy, so I won't show you) to-do list page, and then my login and a timeline. Of course, I've hidden the details, but I've written my username, Personal ID (it's amazing how quickly one can learn that off by heart when Track's being checked every other second) and the answers to my security questions, since I always forget them. Then, I have the school's timeline for our applications (I haven't applied to Oxbridge/for medicine or veterinary science, but our school ask for them to be in super early because although it's not meant to, the chances are it'll give you an advantage).


On the back of that page I'm keeping a log of my application, so the date it was processed, the date I received my welcome pack (which is hardly a pack, more a piece of paper telling you where you've applied and for which course), and a record of any offers I've received (I got my first one yesterday lunchtime - yay!). Not only does this put my mind at ease, but I can also then compare the offer(s) and consider where I wish to put as my firm/insurance choice nearer the time.


I also have this checklist for what to include in the personal statement. Obviously some of these are paraphrased (eg. "Why I'm so bloody brilliant") but I found it really handy to have a structure to follow when writing it. Of course, there is no one set formula for a good personal statement; these are just tips I have picked up from various open days/humans who have done this before/school.

So there you have it, the UCAS section of my Filofax. I can't believe it's ten and a half months until I should be leaving home for uni!

Wednesday, 7 August 2013

How I Organise My Filofax Supplies

Greetings humans!

Today I thought I'd share with you how I organise the supplies I use in my Filofax. Even though this isn't a Filo-specific blog, I decided not to show you my folders/refill pads/pens because they're on shelves/in pen pots respectively and I don't do anything spectacular with those. These supplies, however, are in boxes and stretchy folder things (there I go with those technical terms again), which are infinitely more exciting than shelves, right?


This is the main box in which I keep my bits and bobs - I believe it was bought in a pack of many from Costco. A couple of weeks ago, it was almost empty...and now it's almost full. Oops?


Here's the inside. As you can see, some items are stored loosely, and some are stored in more boxes. Regardless of anything, it's all packed in some kind of warped, 3D, stationery tetris. The loose items include packs of sticky notes and to-do lists, craft papers (for making dividers) and some magnetic bookmarks. 


One of the first storage containers that I use is this Cath Kidston tin. Inside, I keep some mini paper tapes from Paperchase and fashion paperclips from Wilkinson and Tiger.


Then, I have this Really Useful Box. In here are sticky notes, stickers and mini-notepads, sourced from a variety of stores. I used to use a couple of these to store my pens (until my collection went out of control) and they're stackable, which is handy for saving desk space.


Another Box! This was bought in a pack of three from Family Bargains (think 99p stores, Poundland etc), and the lid barely stays on, which is not ideal, even though it sits in a box most of the time. Here are just sticky notes, memo pads and notelets (which I got from The Range's clearance isle - always worth a check). 


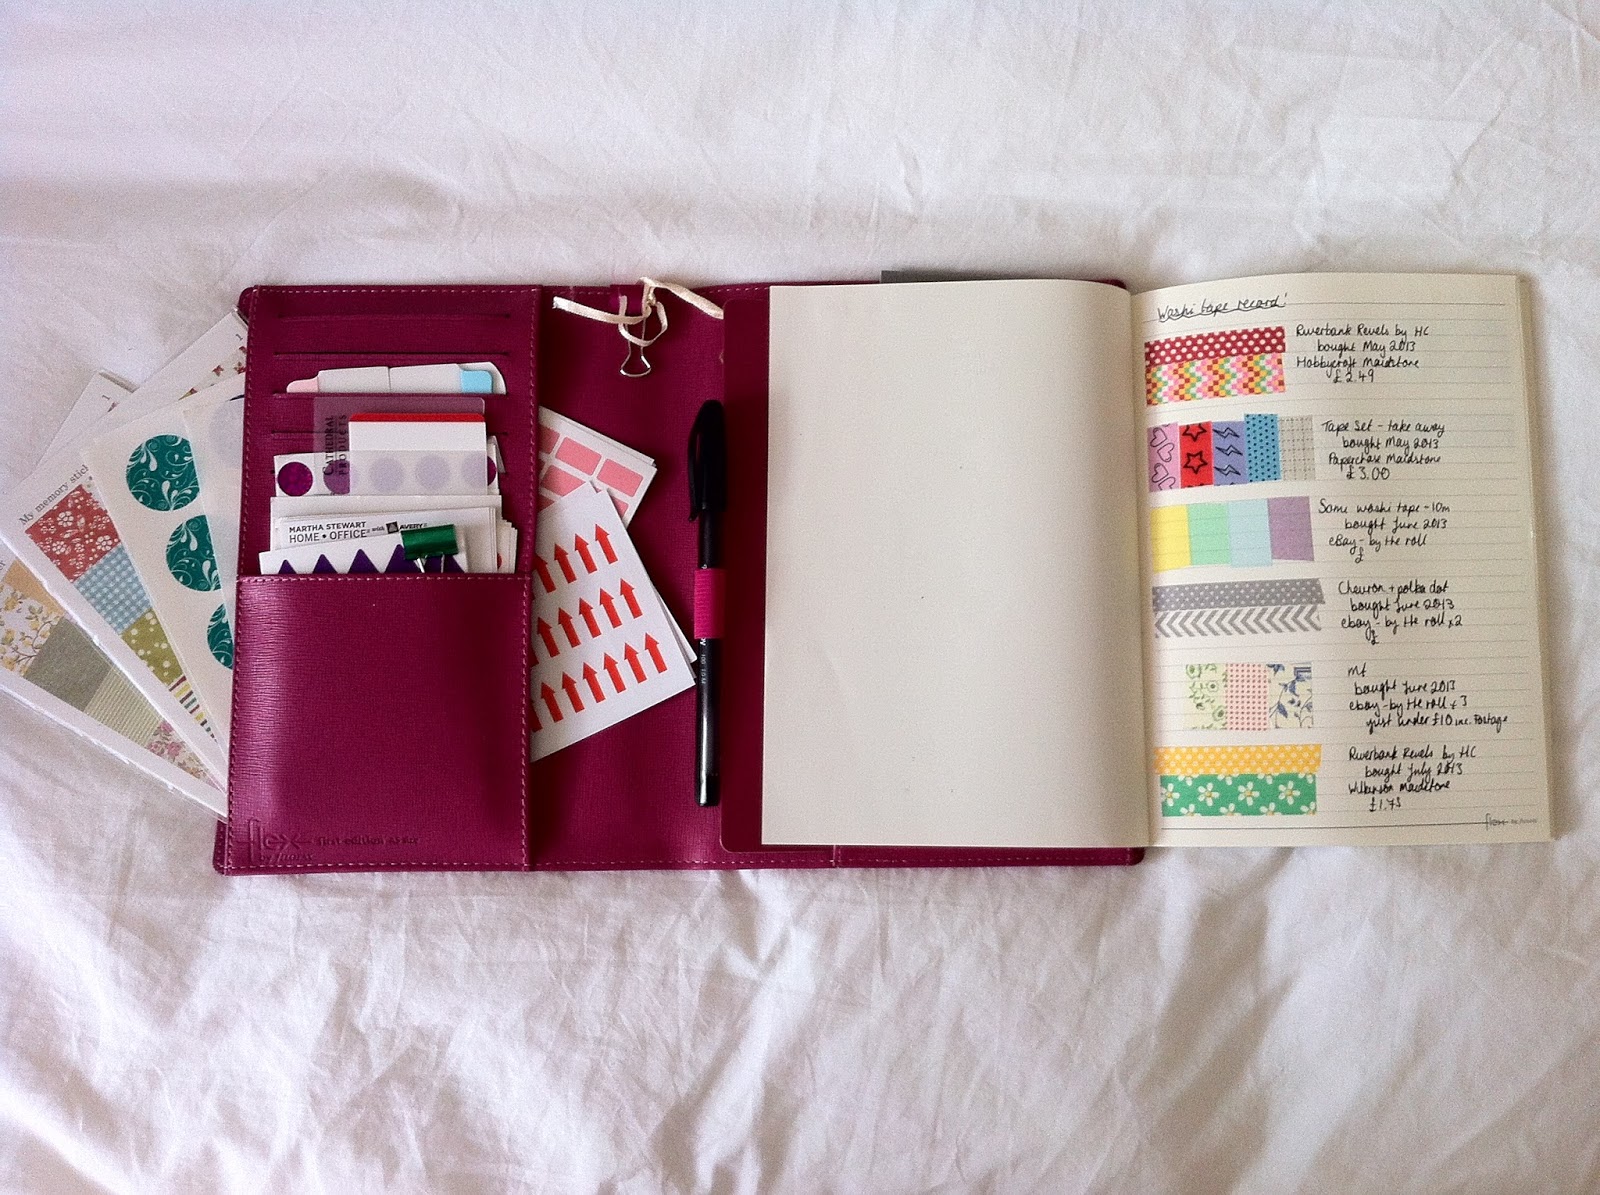
I also use Filofaxes and other ring-bound organisers to store stuff. I bought a first edition Flex from Homsense for £7.99 in which I keep stickers and a record of the washi tape I have. In my Paperchase organiser I keep spare inserts, since it was starting to get a bit worn and I don't want it to break with constant use!

Now, not everything fits in my Pink Box of Wonder. I keep sticker sheets and washi tape in separate containers.


Tape! This is a box, about half the size of a shoebox, which I was given for my birthday (it's from Tiger). I just put a bit of washi on the lid to let me know what was in it, just in case I forget(?!)


This is an expanding sticker folder. An expanding folder for my stickers. (Really not much else to say, right?) There is the potential to customise the tabs, but my sticker supply is in constant rotation so it would probably be a waste of time.

I hope you found this post vaguely interesting, and that it may have given you some inspiration as to how to store anything paper-y.

Saturday, 25 May 2013

How to (badly) make your own Filofax dividers

(I apologise for the poor picture quality - I used my iPad to write this post and apparently pixelation is the new AWESOME)

Greetings humans! Since my exams are now over (huzzah!) I decided that it was about time I made another post, and also about time that I created some new dividers for my Paperchase personal organiser (I apologise that the title may therefore be misleading, although it is the same size as a Filofax personal so there is no reason as to why this post should not be applicable) - therefore, I decided to merge these two elements of my life together for your entertainment and amusement, since it hardly went perfectly.

Here's a picture of my organiser, and Paperchase's own dividers inside (the sticky notes are from Tiger). As you can see, they are a little bright and furthermore, I did not use each section as it was labelled so I struggled to get the most out of this system.


This is the paper I used - I bought it for £10 in Hobbycraft. Although on the surface this seems incredibly expensive, when you take into account how much a set of Filofax dividers usually costs (around £6), and that I only used three sheets of this paper for all six dividers, it is obviously far more cost effective in the long term. I chose to use the pattern I did simply because it was my least favourite. I know it doesn't match the organiser (none of them really do, but since when has matching been something I'm particularly worried about?), and I don't particularly dislike it, but this was my first attempt at creating dividers and so I didn't want to use the best paper in case I made a mess of it - as you will find out, I sort of did.


My plan was simple - draw around the dividers I currently had (if you don't have any current dividers just draw a box the same size as a normal page but make sure you leave room for a tab - I was far too lazy to do this), cut them out, label them, hole punch them, put them in my organiser, sorted. The first stage went perfectly to plan:


I then cut them out and realised that on half of the dividers, the pattern was upside down. This didn't present a massive issue to me - I'm not going to see all of the dividers at once and most of the tabs would have writing on them anyway so the pattern would be somewhat obscured.


To write with, I used this Uni Permanent Marker. Unfortunately, my handwriting was not particularly neat (I think writing so many essays in such a short space of time has taken its toll!) and the ink feathered a little. I only labelled three of the six dividers, simply because I'm still unsure what to use the rest for. I think next time I will create separate labels on separate pieces of paper and stick them on - I couldn't use any other pen because the paper had a plasticy-smooth finish (technical terms AHOY!) so the ink wouldn't set. 


Now onto the most disastrous of my mistakes - the hole punching. For this, I used Rapesco's personal organiser punch, which is available for under £10 on Amazon.


I bought this specific punch because it was adjustable to both pocket and personal sizes, and I also have a pocket Filofax that I use as a purse. Earlier, I had been creating and punching inserts for this, and if you haven't guessed what happened yet then try now. 


That's right, I forgot to change the setting back to personal size before I punched the first divider - I am particularly amused since this is the 'academic' divider and this was a terribly stupid thing to do. Nevertheless, I changed the setting and punched it again...I don't think it looks too bad.

To make sure that the holes were in the centre of the divider and not too high or low, I drew a line on the back of the dividers so they could be lined up with the hole punch (maybe I did do something right!). 


Here is how they finally look in the organiser - evidently handmade, but for my first attempt and considering how awful I am at being a competent human being, I'm quite proud of them. 


I hope you've enjoyed reading about my poor attempt at being vaguely crafty - I'm sure there will be many more to come!